
How Thick Does a Shed Slab Need to Be in Queensland?
The standard thickness for a residential shed slab in Queensland is 100mm — but on the Fraser Coast, soil conditions and site variability mean that’s often just the starting point.
- Standard residential shed slab: 100mm with SL82 mesh reinforcement
- Workshop or heavy-use slab: 125mm–150mm, depending on load and engineer specification
- Thickened edge beam: Minimum 300mm deep perimeter beam — required under Queensland standards for all shed slabs
- Concrete mix: Minimum 25MPa — 32MPa recommended for Fraser Coast conditions, given soil variability and moisture exposure
- Soil considerations: Sandy and variable soils common across Hervey Bay require a compacted subbase and vapour barrier before pour
Every shed slab should be designed to engineer specification — that’s how you know the job is built to last and meets Queensland compliance standards.

Why the Slab Is the Most Important Part of Your Shed Build
Every part of your shed sits on the slab. The frame bolts into it, the walls follow the frame, and the roof follows the walls. If the slab is off — even slightly — everything above it compounds that error.
Anchor bolts set a few millimetres out of position mean kit frames that won’t line up as designed. A surface that isn’t truly level makes roller doors bind, workbenches rock, and water pool where it shouldn’t. A slab that wasn’t properly compacted underneath can develop movement cracks within a year or two — not because of anything above ground, but because of what wasn’t done below it.
Getting the slab right isn’t just about the concrete. It’s the site preparation, the subbase, the reinforcement, the mix strength, and the finishing — all working together to produce a floor that performs for the life of the building.
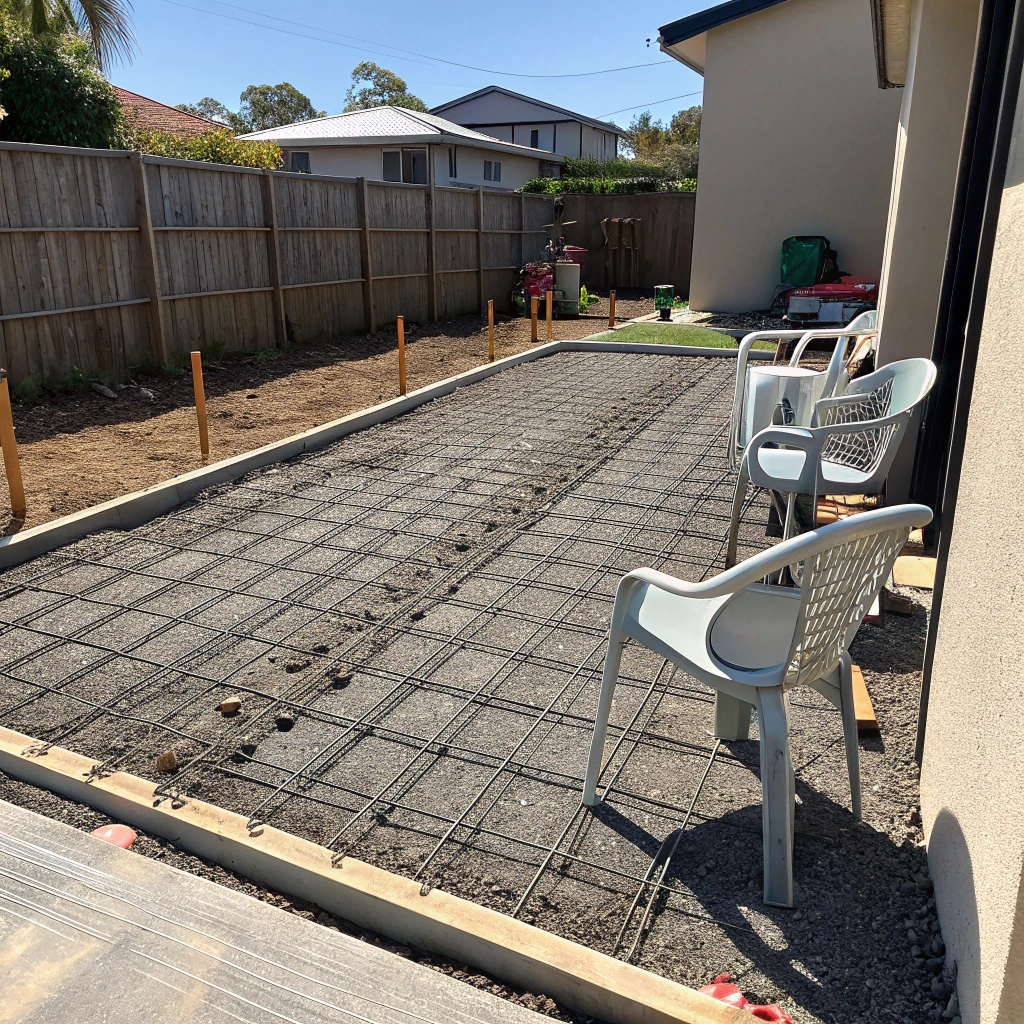
What Goes Into a Properly Built Shed Slab
Here’s what a properly built shed slab actually involves — from the moment we arrive on site to the day the concrete is finished and ready for your kit.
Shed Slab Sizes and Configurations We Handle
We pour shed slabs right across Hervey Bay and the Fraser Coast — from compact suburban storage sheds through to large rural machinery sheds on acreage properties.
Garden and Small Storage Sheds: Typical sizes range from 3x3m through to 6x4m across Hervey Bay’s suburban blocks. Straightforward pours, but they still need proper reinforcement, a level finish, and a compliant edge beam. Small doesn’t mean simple.
Workshop and Garage Slab: Floor levelness and anchor bolt placement are critical here. We work from kit shed drawings, where supplied, to make sure bolt positions are accurate before the concrete goes down — small deviations at this stage cause real problems when the frame goes up.
Large Rural and Machinery Sheds: Heavier loads mean thicker slabs — often 125mm to 150mm — and engineer-designed reinforcement layouts. Rural soil conditions across the Fraser Coast also require more detailed site preparation. We’ve poured large machinery shed slabs across the region and know what’s required to build them to spec.
Shed Slab Thickness and Engineering Requirements in Queensland
Queensland standards set the baseline — but your specific site, soil, and intended use determine where your slab lands within those requirements.
For most residential shed slabs, 100mm with SL82 mesh reinforcement is the starting point. Workshop and heavy-use slabs typically step up to 125mm–150mm, depending on load requirements and the engineer’s specification. All shed slabs in Queensland require a thickened edge beam — minimum 300mm deep — around the full perimeter.
Concrete strength matters too. The minimum standard is 25MPa, but 32MPa is the better call for Fraser Coast conditions, where soil variability and moisture exposure are real factors.
Engineer design is required when the slab exceeds certain span or load thresholds — and on rural properties or sites with poor subbase conditions, it’s worth having regardless. A signed engineer design also gives you documentation that the slab was built to spec, which matters when it comes time to sell the property or lodge a building approval.
Getting Your Slab Level and Square Before the Kit Arrives
If you’ve already bought your shed kit — or you’re about to — this section is for you.
Shed kits are manufactured to precise dimensions. The anchor bolts that hold the frame to the slab have to be positioned exactly to the manufacturer’s specifications — not approximately, exactly. If those bolts are even slightly out of position, the frame won’t sit as designed. Door and window openings won’t clear properly. Panels won’t line up. What looks like a framing problem almost always starts at the slab.
Level matters just as much as square. A slab that falls away even a few millimetres across its length means the entire frame follows that fall. Roller doors bind. Gaps appear at the base of walls. Water finds its way in.
We set out anchor bolt positions from the kit drawings before the pour, check levels across the full slab area, and finish to a standard that the kit frame can go straight onto. Getting this right before the kit arrives on site is the difference between a clean, straightforward build and a frustrating one.

Hervey Bay Soils, Climate and What They Mean for Your Slab
The Fraser Coast has specific conditions that affect how a shed slab needs to be built — and any concreter who doesn’t account for them is cutting corners.
Sandy coastal soils are common across Hervey Bay and drain freely but offer poor load-bearing capacity without proper compaction. In other parts of the Fraser Coast, clay-heavy soils expand and contract with wet and dry cycles — that movement transfers directly to an unsupported slab over time.
High humidity and salt air exposure mean a vapour barrier isn’t optional here, and concrete mix selection matters more than it does in drier inland conditions. Seasonal wet periods bring heavy rainfall that can compromise a subbase if drainage isn’t properly considered during site prep.
We factor all of this into every slab we pour — mix strength, subbase depth, vapour barrier, and finishing standard are all shaped by local conditions, not just Queensland minimums.
Shed Slab Costs in Hervey Bay — What Affects Your Quote
Shed slab pricing varies — and anyone who gives you a fixed price without seeing your site is guessing. Here are the main variables that influence what your slab will cost.
- Slab size: Larger footprints mean more concrete, more steel, and more labour
- Thickness: Workshop and heavy-use slabs requiring 125mm–150mm cost more than standard 100mm residential pours
- Soil conditions: Sites needing significant subbase work or fill compaction add to preparation costs
- Access constraints: Tight suburban blocks or rural properties with limited truck access affect our logistics and pricing.
- Steel reinforcement spec: Engineer-designed reinforcement layouts for larger or heavier slabs carry additional material and labour costs
- Engineer design fees: Required on some sites and larger spans — a separate cost worth factoring into your budget
- Finishing standard: A basic broom finish costs less than a smooth float finish prepared for coatings or epoxy.
Frequently Asked Questions
For a standard residential shed, 100mm with SL82 mesh reinforcement is the baseline. For workshops or heavy-use slabs, we typically recommend 125mm–150mm, depending on load requirements and the engineer’s specification.
Not always — but on larger spans, rural properties, or sites with poor subbase conditions, an engineer-designed solution is worth having. It also gives you documentation that the slab was built to spec, which matters for building approvals and future property sales.
We use a minimum of 25MPa, but we recommend 32MPa for Fraser Coast conditions. The stronger mix handles local soil variability and moisture exposure better over the long term.
Yes. In Hervey Bay’s humid coastal environment, ground moisture will work its way up through an unsealed slab over time. A vapour barrier is standard practice on every shed slab we pour.
Concrete reaches sufficient strength for frame installation at around 7 days under normal conditions. We recommend waiting the full 28-day cure period before applying heavy loads or coatings.
Yes — and we always recommend it. Supply us with your kit drawings before the pour, and we’ll set the anchor bolt positions exactly to the manufacturer’s specifications. This is the step that makes frame installation straightforward.
Sandy coastal soils and clay-heavy soils both present challenges — poor load-bearing capacity and seasonal movement, respectively. We account for this through subbase compaction, appropriate mix selection, and vapour barrier installation on every job.
Ready to Get Your Shed Slab Done Right?
A free site measure is the best place to start. We’ll come out to your property, assess the site conditions, check access, and give you an accurate quote based on your actual slab requirements — not a ballpark figure over the phone.
No pressure, no obligation. Just a clear, itemised quote from a local Fraser Coast concreter who specialises in shed slabs.
Call us today or fill out our online quote request form with your shed size, location, and a brief description of the job. We’ll be in touch quickly to lock in a time that suits you.
Get your free shed slab measure and quote today.